Digital watch
Make the time variables
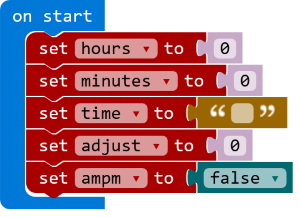
We need to make some variables to keep track of the time and for a few other things.
- Go into Basic in the toolbox and pull an basic:on start on to the workspace.
- Ok, in Variables click on
Make a Variable. Name the variable ashours. Drag out a variables:set to block and change the name with the dropdown tohours. Place the variable into the basic:on start block. - Repeat this 4 more times to make variables named
minutes,time,adjust, andampm. - Now, for the variables:set to block for
time, go to Text and drag a" "in and replace the0. - For the
ampmvariable, change the0there to afalsefrom the Logic catagory.
Display the time, kind of
So, let’s try showing the time on the display. We aren’t keeping time yet but we’ll just see if we can make our watch show something.
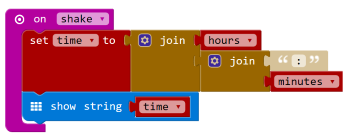
- Get in the Input catagory and pull out an input:on shake. We’ll have our watch show the time when it’s shaken.
- Get another variables:set to and put it into the input:on shake. Change the name to
time. - Replace the
0with a text:join from Text. Get another text:join and put it into the second slot of the first text:join you pulled out. - Change the
" "in the first text:join to thehoursvariable. Change the text in the first slot of the second text:join to":". And, change the last slot in the second text:join to theminutesvariable. - Finally, stick in a basic:show string below the variables:set to. Switch the text inside to the variable
time. - Download the code to you @boardname@ and give it a shake. Did you see the time of “0:0” go by on the LEDs?
Set the time with buttons
There has to be a way to set the time on your watch. We’ll use the buttons to set the current time. One button is for setting the hours and another button is for the minutes.
Set the hours
Let’s make a way to set the hours for the watch.
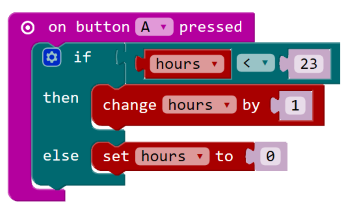
- In Input, find an input:on button pressed an put it somewhere on the workspace.
- Get an logic:if then else block from Logic and put it in the input:on button pressed.
- From the same Logic category, get a logic:0 < 0 and relpace the
falsecondition with it. - Change the left
0in the condtion to thehoursvariable. Change0on the right to23. This limits our hour count to 23 hours. - In the logic:then section, put a variables:change by there. Select the
hoursvariable name from the dropdown. - In the logic:else section, put a variables:set to there. Select the
hoursvariable name from the dropdown and leave the0.
Set the minutes
Setting minutes is almost the same as setting hours but with just a few changes.
- To make things easy, right click on input:on button pressed block and select the Duplicate option in the menu. This makes a copy of the original block.
- In the new input:on button pressed, change the button to
B. - Change every variable name from
hourstominutes. Change the23in the logic:if condition to59. This is the limit of minutes we count.

Select 24 hour or 12 hour time
Time is shown in either 24 hour or 12 hour format. We’ll use one more button to choose which format to show. Using the 12 hour format adds an ‘AM’ or ‘PM’ at the end.
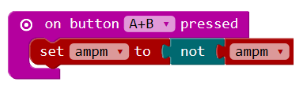
- In Input, get an input:on button pressed an put it on the workspace. Change the button to
A+B. - Grab a variables:set to, put it in the block and change the variable to
ampm. Put a logic:not from Logic in where the0is. - Pick up a
ampmfrom Variables and connect it on the right of the logic:not. This switches our 24 hour format to 12 hour and back.
Make the timer tick
A watch really has three parts: the display, settings, and timer. We need a way to make the minutes and hours count up at the right time. Let’s code the timer.
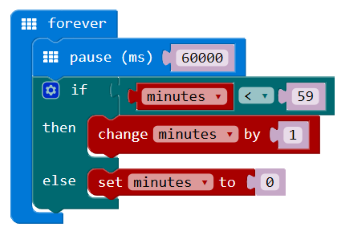
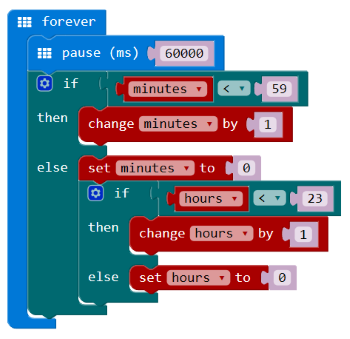
- In Basic, get a basic:forever loop out to the workspace.
- Also in Basic, take out a basic:pause an put it into the loop. Change the time from
100to60000. The time is in milliseconds so we want to count each minute every 60000 milliseconds. - Below the basic:pause, put a logic:if then else block. Change the condition in the logic:if to use a logic:0 < 0.
- Replace the
0on the left with theminutesvariable. Change the0on the right to59. - Put a variables:change by into the logic:then. Change the variable to
minutes. - Get a variables:set to and put it in the logic:else. Again, change the variable to
minutes.
Keep on coding…
- Now, take another logic:if then else and put it just below the variables:set to inside the first logic:else.
- In the second logic:if, put in a logic:0 < 0 as the condition. Replace the left
0with thehoursvariable. Change the right0to23. We count hours up to 23 until we go back to 0 (midnight). - Put a variables:change by into the second logic:then. Change the variable to
hours. - Get a variables:set to and put it in the second logic:else. Again, change the variable to
hours. Ok, the timer’s ready to tick.
Shake and show…the time!
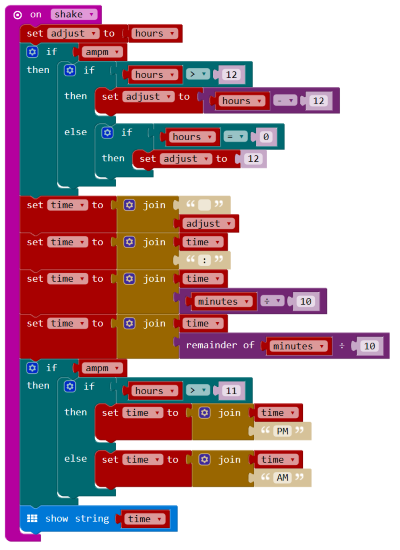
We’re going back to the display code we made earlier. We’ll now make it show the real time! This step is going to be busy but we’ll get it done.
First, we have to code an adjustment for the hours number when we’re using the 12 hour format.
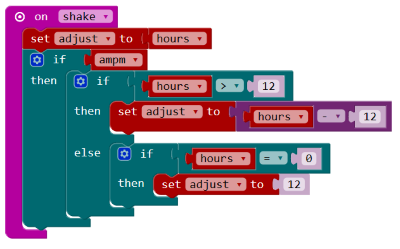
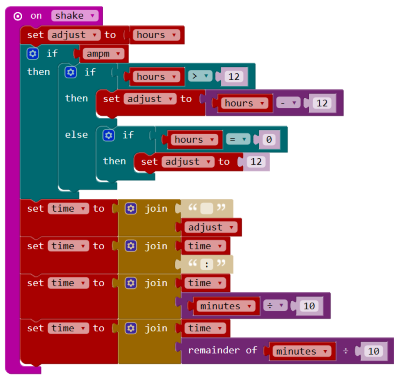
- Find the input:on shake block we coded earlier. Pull out and drag to the trash the blocks inside. We’re starting fresh.
- Pull out a variables:set to an put it inside the input:on shake. Change the variable to
adjust. Change the0on the right to thehoursvariable. - Get a logic:if then and put it under the variables:set to. Replace the condition with the
ampmvariable. - Grab a logic:if then else and put it in the logic:then part of the first logic:if then. Change the condition to logic:0 < 0. Replace the
0on the left with thehoursvariable. Change the0on the right to12. Switch the<to a>. - Go get another variables:set to and put it in the logic:then of the second logic:if then else. Change the variable to
adjust. In Math take a math:0 - 0 and replace the0in the variables:set to. Change the0on the left to thehoursvariable and the0on the right to12. - Take one more logic:if then and put it in the logic:else. Change its condition to logic:0 = 0. Put the
hoursvariable in place of the0on the left. - Inside this last logic:if then place a variables:set to. Change the variable name to
adjustand set the value to12.
Keep on coding…
Now, we have to join up the hours and minutes to make text that will display on the watch.
- At the bottom of the input:on shake, insert a variables:set to. Change the variable name to
time. Connect it to a text:join from Text. - Make 3 copies of this last variables:set to using the Duplicate option in the menu when you right click on the block. Put the copies underneath each other so that all 4 are stacked together.
- In the first variables:set to, replace the second
""in the text:join with theadjustvariable. - With the second copy, change the first
""in the text:join to the variabletime. Change the second string in the text:join to":". - In the third copy, change the first
""in the text:join to the variabletime. Change the second string in the text:join to division operator from Math. Set the left0to theminutesvariable and the right0to10. - In the fourth copy, change the first
""in the text:join to the variabletime. Change the second string in the text:join to a Math:remainder of in Math. Set the left0to theminutesvariable and the right0to10.
Keep on coding…
Ok, we’re getting close to finishing now. Here we need to add the ‘AM’ or ‘PM’ if we are in 12 hour format. Then, finally, display the complete time string.
- Put an logic:if then block at the end of the input:on shake. Replace the
truecondition with the variableampm. - Insert a logic:if then else into this logic:if then. Use a logic:0 < 0 as the condition. Change the left
0to thehoursvariable. Change the right0to11. Switch the<to a>. - Place a variables:set to in the logic:then. Change the variable to
timeand attach a text:join. Make the first part of the text:join be the variabletimeand the second part to the text"PM". - Do the exact same thing as in the last step but put the variables:set to block in the logic:else underneath. Make the second part of the text:join be
"AM"this time. - Finally, at the very bottom of input:on shake, go get a basic:show string from Basic and put it there. Change the string
"Hello!"to thetimevariable.
Code Complete
Wow, so awesome! You’ve got your watch coded and ready to try. Go press the Download button and put your code on your micro:bit. When you shake it, it shows the current time.
Right now, it’s showing 24 hour format: hours go from 0 to 23 and back to 0. Press the A+B buttons together to change to 12 hour format: hours go from 12 to 12 with 1 through 11 in between. It has either "AM" or "PM" at the end.
To set it to the current time, you use the A and B buttons. The A button moves the current hour up by one each time it’s pressed. The B button moves the minutes up by one every time it’s pressed.
Enhancements
Think about how you can enchance your watch application. Can you chang the code to make it simpler? Are there any features you would like to add?